Track Control Arm, Ball Joint, Guide Link and Level Control System Sensor Overview
Track Control Arm, Ball Joint, Guide Link and Level Control System Sensor Overview
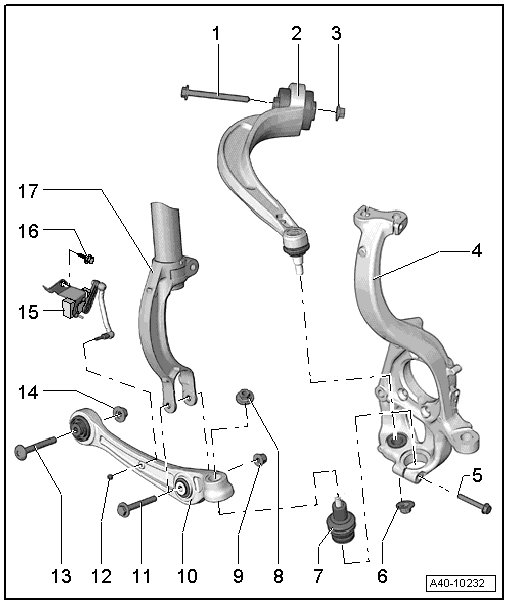
1 Bolt
• Always replace if removed.
2 Guide Link
• Removing and installing, refer to => [ Guide Link ] Service and Repair
• Different versions, for allocation refer to the Parts Catalog
• A mixed installation is not permitted
• Conventional bonded rubber bushing, removing and installing, 65 mm. Refer to => [ Conventional Bonded Rubber Bushing, 65 mm ] Conventional Bonded Rubber Bushing, 65 mm.
• Replacing the hydraulic bonded rubber bushing 75 mm for the guide link. Refer to => [ Hydraulic Bonded Rubber Bushing, 75 mm ] Hydraulic Bonded Rubber Bushing, 75 mm.
3 Nut
• 70 Nm + 180° turn
• Always replace if removed.
• Must be tightened in the curb weight position. Refer to => [ Wheel Bearing, with Coil Spring, Lifting to Curb Weight Position ] Procedures
4 Wheel Bearing Housing
5 Bolt
• 40 Nm
• Always replace if removed.
6 Nut
• Always replace if removed.
• Different versions, for allocation refer to the Parts Catalog
• Pay attention to the different nut versions and to the tightening specifications
• After loosening threaded connection of guide control arm to wheel bearing housing, adhesive residue must be removed on thread of linkage stub.
7 Ball Joint
• Removing and installing, refer to => [ Ball Joint ] Service and Repair
• Different versions, for allocation refer to the Parts Catalog
• Note installed position => [ Installing ] Service and Repair
• Install the ball joint into the wheel bearing housing up to the contact surface.
8 Nut
• Always replace if removed.
• Different versions, for allocation refer to the Parts Catalog
• Pay attention to the different nut versions and to the tightening specifications
• After loosening threaded connection on the ball joint to the wheel bearing housing, adhesive residue must be removed on thread of linkage stub.
9 Nut
• 90 Nm + 90° turn
• Always replace if removed.
• Must be tightened in the curb weight position. Refer to => [ Wheel Bearing, with Coil Spring, Lifting to Curb Weight Position ] Procedures.
10 Control Arm
• Removing and installing, refer to => [ Control Arm ] Control Arm
• Replacing bearings for track control arm, refer to => [ Control Arm Ball Bearing, Replacing ] Control Arm Ball Bearing, Replacing
11 Bolt
• Always replace if removed.
12 Nut
• 9 Nm
13 Bolt
• Always replace if removed.
14 Nut
• 70 Nm +180° turn
• Always replace if removed.
• Must be tightened in the curb weight position => [ Wheel Bearing, with Coil Spring, Lifting to Curb Weight Position ] Procedures
15 Left Front Level Control System Sensor (G78) or Right Front Level Control Sensor (G289)
• Only sensors of the same version may be installed.
• Only remove and install or replace completely. Refer to => [ Level Control System Sensor ] Level Control System Sensor
• The sensor lever must point toward the back.
• After loosening, check basic setting of headlamp adjustment.
• If the vehicle level sensor was removed and installed on a vehicle with electronically controlled damping or if the linkage was loosened, the control position must be reprogrammed. Refer to => [ Programming Control Position using ] Testing and Inspection. Vehicle diagnostic tester.
• If the control position was reprogrammed on vehicles with lane assist, the directional stabilization assistance control module (J759) must be recalibrated. Refer to => [ Calibration Procedure ] Calibration Procedure.
16 Bolt
• 20 Nm
17 Shock Absorber Fork
Nut Versions for the Control Arm and Guide Control Arm Bracket
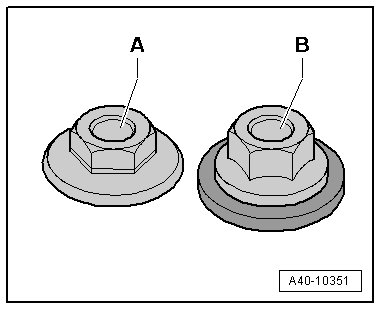
• Hex - collar nut - A - M12 wrench 21 mm
Tightening specifications: 145 Nm
• Hex - combination nut - B - M12 18 mm
Tightening specifications: 110 Nm
• Hex - combination nut - B - M12 21 mm
Tightening specifications: 120 Nm
• Hex - combination nut - B - M14 wrench 21 mm
Tightening specifications: 140 Nm