Connecting Points In Refrigerant Line, Disconnecting and Connecting
Connecting Points In Refrigerant Line, Disconnecting and Connecting
• This connecting point is not installed in all vehicles (for example, installed in vehicles with 6 cylinder engines at this time). Refer to Electronic Parts Catalog (ETKA).
Loosening
- Discharge refrigerant circuit.
- Remove the noise insulation.
- Remove bolt - A - (tightening specification: 10 Nm), counterhold at connecting point using a suitable tool when doing this (but do not twist refrigerant lines).
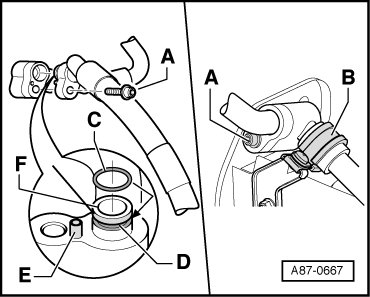
- Loosen the clamp - B -.
- Pull lines apart.
• Seal off open lines with caps to keep dirt and humidity from getting in.
Assembling
Assembling is carried out in the reverse order, when doing this note the following:
- Replace O-ring seal - C -. Refer to=> [ Refrigerant Circuit O-rings ] Refrigerant Circuit O-Rings and Electronic Parts Catalog.
- Check fitted pin - E - and bushing - F - for damage and proper seating.
• Coat the O-ring seals lightly with refrigerant oil prior to installation. Refer to=> [ Refrigerant Circuit O-rings ] Refrigerant Circuit O-Rings.
• Check O-ring seals for proper seating in groove - D - of respective refrigerant line.
• Install refrigerant pipes such that they are not strained.
- Evacuate and re-charge refrigerant circuit.
- Operate the A/C system after filling the refrigerant circuit. Refer to=> [ A/C System, Operating After Filling Refrigerant Circuit ] Procedures.
• Note the information regarding operating the A/C system after filling.