Chain and Disc Set I
Chain and Disc Set I
Special tools, testers and auxiliary items required
• Seal Installer (3241)
• Puller (T10055)
• Retaining Device (T40130)
• Thrust piece (T40131)
• Puller (T40132)
• Pressure air hose for tire valves
Removing
Proceed as follows:
- Remove the transmission.
- Secure the transmission on the assembly stand. Refer to => [ Transmission, Securing in Engine/Transmission Holder ] Transmission, Securing in Engine/Transmission Holder.
- Remove the transmission.
- Remove the transmission control unit (J217). Refer to => [ Transmission Control Module ] Transmission Control Module.
- Remove the hydraulic control unit. Refer to => [ Hydraulic Control Module ] Hydraulic Control Module.
- Remove the axial sealing elements - A - (4 pieces) and - B -.
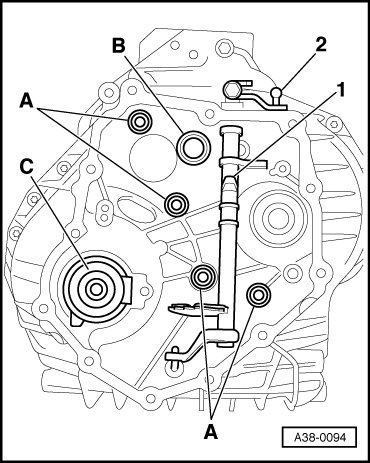
• The axial sealing elements must be replaced.
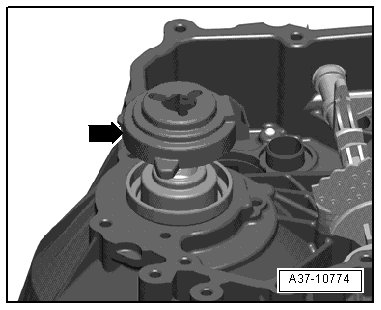
- Remove the cover - arrow - for the sensor wheel II.
- Remove the sensor wheel II using 2 screwdrivers - arrows -.
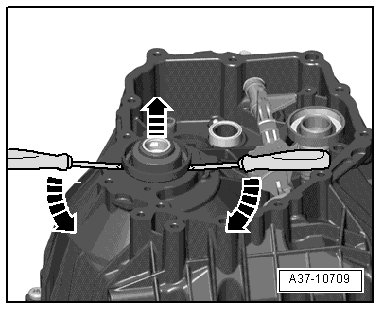
• The sensor wheel must be replaced.
- Remove the sensor wheel using I with (T40132) and (T10055).
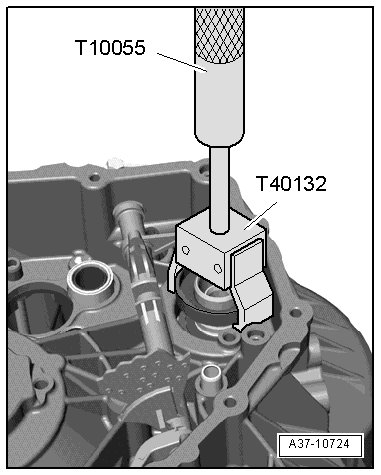
• The sensor wheel must be replaced.
- Remove the oil pipe - arrow - by hand upward.
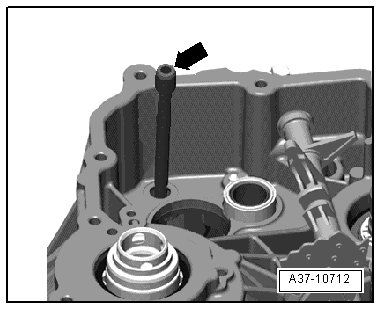
• Do not use any tools otherwise the sealing surfaces will be get damaged.
- Remove the circlip - 3 - from the disc set shaft I - 1 -.
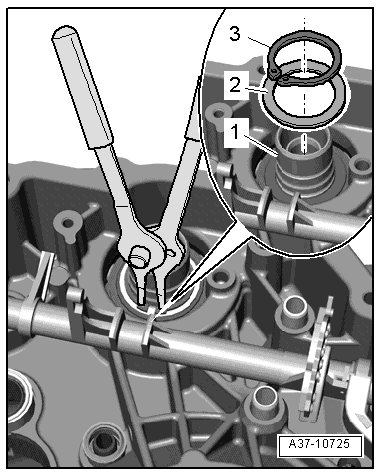
- Mark and remove the shim - 2 -.
Danger of interchanging.
• Be careful not to interchange the thrust washer - 13 - => [ Thrust Washer ] Chain and Disc Set I Overview with the shim - 2 - under the circlip - 3 -.
• To prevent interchanging them, secure the shim - 2 - to the circlip - 3 - with a tie wrap.
- Remove the intermediate housing - arrow -; pay attention to the different length; if necessary, mark the installation position of the bolts.
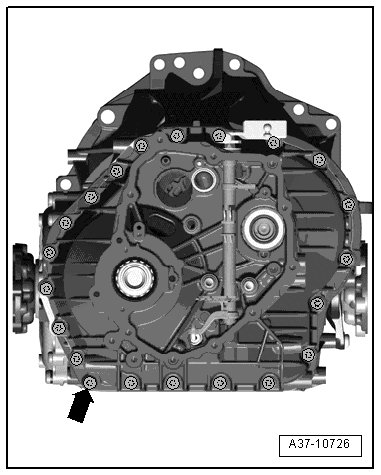
- Remove the intermediate housing.
- Mark the thrush washer - 1 - and remove it from the disc set I - 3 -.
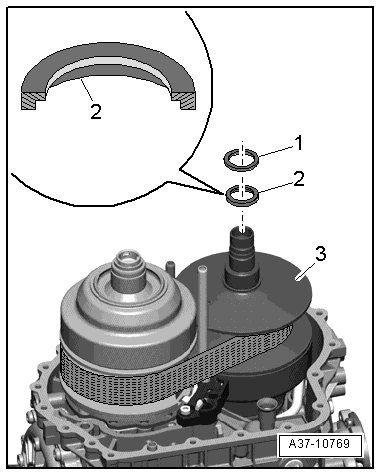
- Remove the spacer ring - 2 - (if equipped depending on version!) from the disc set I.
Danger of interchanging.
• Be sure not to interchange the thrust washer - 1 - with the shim - 12 - => [ Adjusting Shim ] Chain and Disc Set I Overview under the circlip.
• Mark the thrust washer - 1 - with color.
- Remove the intermediate housing seal - 1 -.
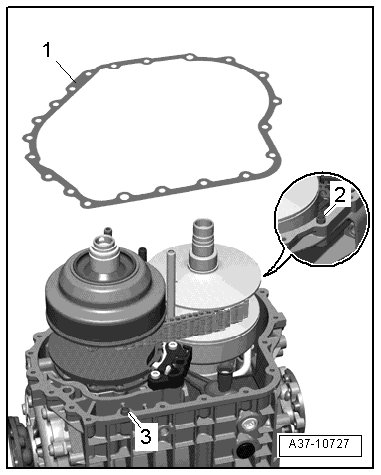
- Remove the alignment bushing - 3 -.
• The alignment bushing - 3 - must be removed, so that the retaining device (T40130/1) can be mounted to the transmission.
• The alignment bushing - 2 - can remain attached to the transmission.
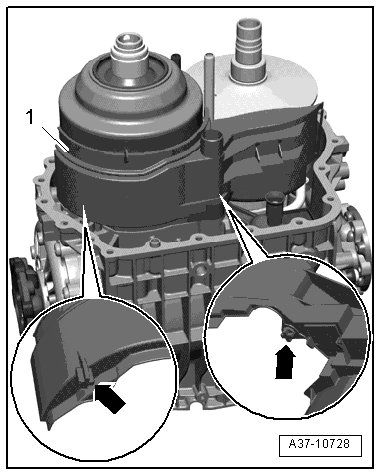
- Remove the oil guide piece I - 1 -; to do so, carefully remove the retaining pins - arrows -.
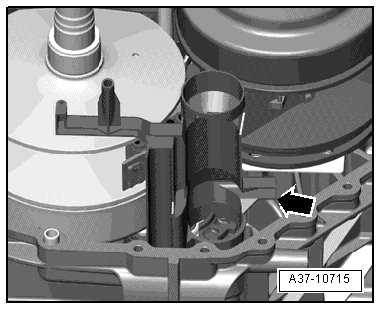
- Pull the oil guide piece II - arrow - upward.
Measure the chain height:
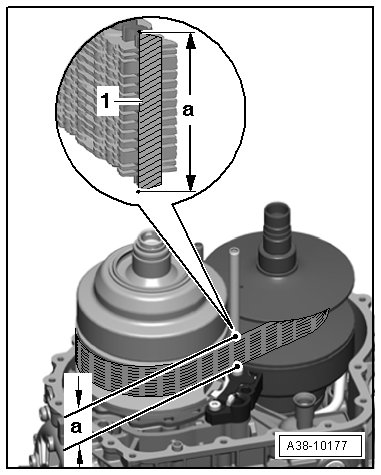
• For the chain height, the height of the chain bolt is used.
- Measure the height - a - of the chain bolt - 1 -.
• The chain and the chain bolt - 1 - are illustrated in section.
• In the following work procedure, there will be a difference between two chain heights.
Transmission with chain height - a - = 34 mm:
- Mount the (T40130/2) onto the disc set II.
• Check to make sure the O-rings are seated correctly in the (T40130/2). Both O-rings must be present.
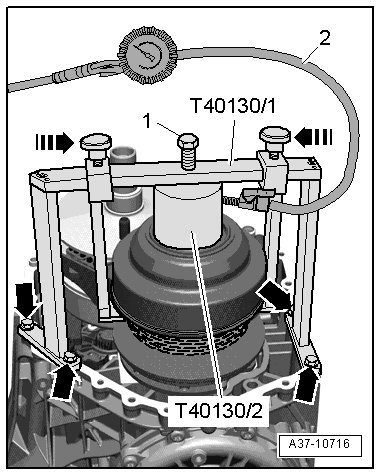
• The O-ring in the (T40130/2) and the sealing surfaces on the disc set must be clean and coated with ATF.
- Center the (T40130/1) to the (T40130/2) and bolt to the transmission housing - lower arrows -, as illustrated.
- Insert the bolt - 1 - far enough until the (T40130/2) presses against the disc set II.
- Connect the pressure air hose - 2 - for the tire valves to the (T40130/2) and give approximately 3 bar pressure.
• The disc set opens, the chain relaxes.
- To secure the upper sides, push both hooks in direction of - arrow -.
- Lock the hooks in this position with the knurled screws, at the same time, do not clamp the chain.
Transmission with chain height - a - = 38 mm:
- Mount the (T40130/2) onto the disc set II.
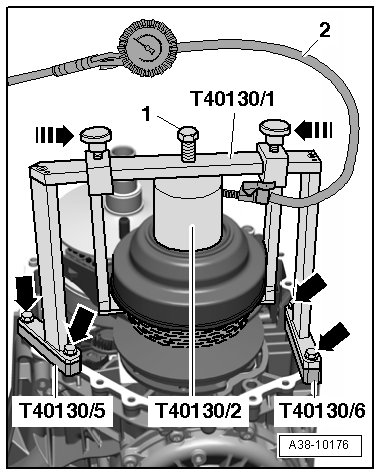
• Check to make sure the O-rings are seated correctly in the (T40130/2). Both O-rings must be present.
• The O-ring in the (T40130/2) and the sealing surfaces on the disc set must be clean and coated with ATF.
- Center the (T40130/1) with the spacers (T40130/5) and (T40130/6) on the (T40130/2) and mount it to the transmission housing - lower arrows -, as illustrated.
- Insert the bolt - 1 - far enough until the (T40130/2) presses against the disc set II.
- Connect the pressure air hose - 2 - for the tire valves to the (T40130/2) and give approximately 3 bar pressure.
• The disc set opens, the chain relaxes.
- To secure the upper sides, push both hooks in direction of - arrow -.
- Lock the hooks in this position with the knurled screws, at the same time, do not clamp the chain.
Continuation for transmission with all chain heights:
- Turn the chain so that the link with the production date stamped on it - A - is visible.
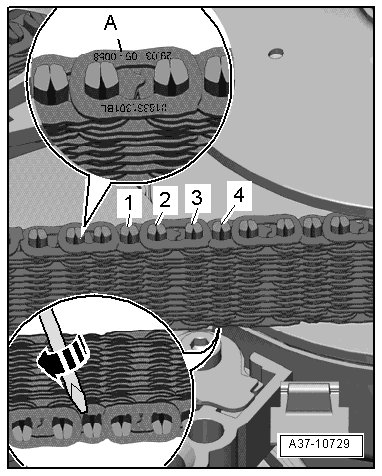
- Open the chain on the 4th chain bolt next to the marked chain link.
- Place a cloth under the chain to prevent any welding points from falling into the transmission.
- Break off any lower welding points on both halves of the 4th chain bolt - arrow -.
- Remove the two piece chain bolt upward.
Do not bend the chain, this could damage it.
- Mark the installation position of the glide track - 2 -.
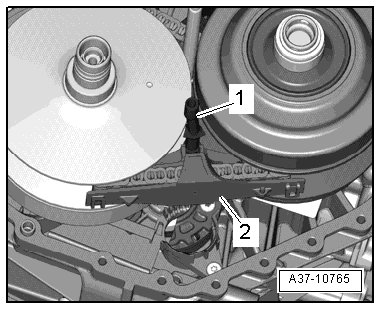
- Unclip the glide track on the oil pipe - 1 -, remove the chain and glide track.
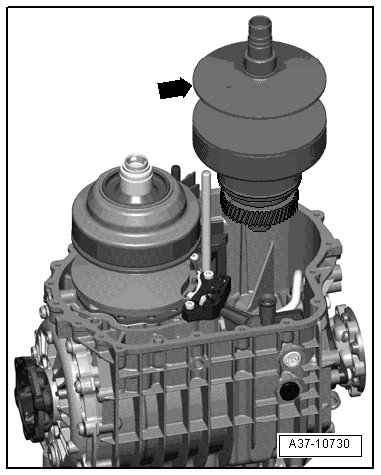
- Remove the disc set I - arrow - upward.
Installing
• Tightening specifications, refer to => [ Chain and Disc Set I Overview ] Chain and Disc Set I Overview.
• Check bearing D and bearing E for wear, refer to => [ Bearings D, E and G, Checking for Wear ] Bearings D, E and G, Checking for Wear.
• Check the chain, disc set I and II, bearing C and suction jet pump, refer to => [ Chain, Disc Set I and II, Bearing C and Suction Jet Pump, Checking for Wear ] Chain, Disc Set I and II, Bearing C and Suction Jet Pump, Checking for Wear.
• If the disc set I is being replaced, then the shim and the circlip must be measured again => [ Determining the Shim and Circlip ] Disc Set I.
- Carefully install the disc set I - arrow - into the roller bearing.
• The splines must engage into the splines on the input shaft.
- Clean chain, if applicable, removal metal shavings between the chain links.
- Attach the glide track - 2 - to the chain, which was marked during removal, to the oil pipe - 1 -.
- Pull the chain so that both open ends align.
- Place the chain at the open end with a cable tie - 1 -, as illustrated.
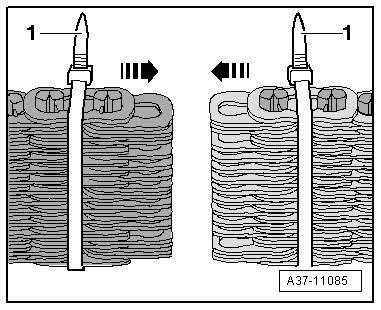
• By tightening the chain, the chain links are held parallel and fixed and cannot be crooked when added together.
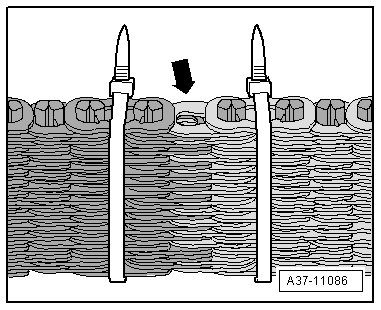
- Reconnect the chain - arrows -, so that the chain links are straight and parallel to each other.
• Due to design, the distance of the chain links to each other is different - arrow -.
- Install both halves of the chain bolt - 1 - and - 2 - from the top, as illustrated.
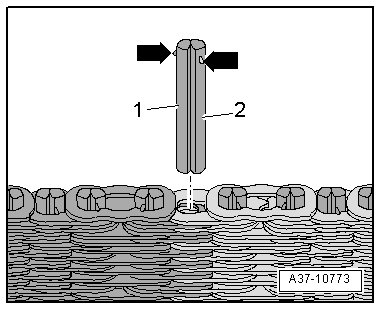
• The welding points - arrows - face upward.
• The broken off welding points on the chain bolt face downward.
• Both halves of the chain bolt are formed asymmetrical.
- Remove cable ties from the chain.
- Loosen the knurled-head bolt and push the hook opposite the direction of - arrow - toward the outside.
- Remove the pressure air hose - 2 - for the tire valve from the (T40130/2).
- Bleed the (T40130/2) via the pressure air valve.
• The valve need on the pressure air valve must pushed down using a small screwdriver.
• The disc set closes, the chain tensions itself.
- Install the oil guide piece II - arrow -.
- Install oil guide piece I - 1 -.
• The retaining bolts - arrows - must engage into the holes in the transmission housing.
- If equipped, install the spacer - 2 -. Note the installation position, as illustrated.
- Install the thrust washer - 1 - on the disc set I- 3 - according to the marking made during removal.
• If, in the disc set I a spacer - 2 - was installed, then it can be installed again if the former bearing D with inner race was not replaced. For bearing D without an inner race, a spacer cannot be installed.
Danger of interchanging.
• Be sure not to interchange the thrust washer - 1 - with the shim - 12 - => [ Adjusting Shim ] Chain and Disc Set I Overview under the circlip.
- Remove the intermediate housing seal - 1 -.
- Make sure the alignment sleeves - 2 and 3 - are installed, if necessary install them.
- Install the intermediate housing.
- Install the bolts - arrow - for the intermediate housing and tighten in diagonal sequence and in stages.
• Depending on the version, the bolts can have different lengths.
• If the same disc set I was installed again, then the original shim and a new circlip - with the same strength and the old circlip - are installed.
- Rotate the transmission housing on the engine/transmission support, so that the disc set I contacts the intermediate housing by its own weight.
• The circlip - 3 - fits into the groove on the shaft and the bearing does not get damaged when the sensor wheel I is not installed.
- Install the marked shim - 2 - onto the shaft for the disc set I - 1 -.
- Install the new circlip - 3 - into the groove on the shaft for the disc set and press it in.
• Pay attention to the installed location: The bores in the circlip eyes are conical. The narrow side faces up
• The circlip must contact the base of the groove.
• The following illustrates the intermediate housing facing upward opposite the transmission bearing.
• Always replace the sensor wheels I and II.
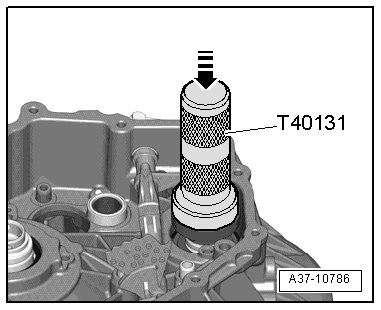
- Carefully tap the new sensor wheel I and thrust piece (T40131) with a rubber hammer all the way in - arrow -.
- Pull out the assembly help (3241/2) from the sleeve (3241/1).
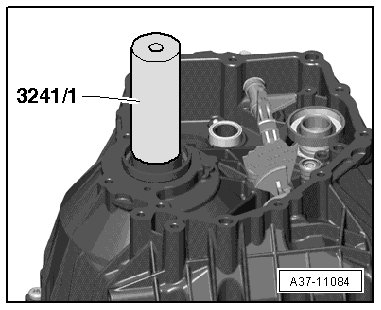
- Carefully tap the new sensor wheel II and (3241/1) with a rubber hammer all the way in.
- Turn the transmission on the engine/transmission support so that the intermediate housing faces upward once again.
- Install the oil pipe - arrow - by hand.
• Do not use any tools otherwise the sealing surfaces will be damaged.
- Install the cover - arrow - for the sensor wheel II
• The tab on the back of the cover must be inserted into the small hole on the transmission.
- Install the hydraulic control unit. Refer to => [ Hydraulic Control Module ] Hydraulic Control Module.
- Install the transmission control module (J217)=> [ Transmission Control Module ] Transmission Control Module.
- Install the cover.
- Install the transmission.