Battery
Battery
Removing
- Switch off ignition and remove ignition key.
Sedan:
- Lift and secure luggage compartment floor mat.
Avant:
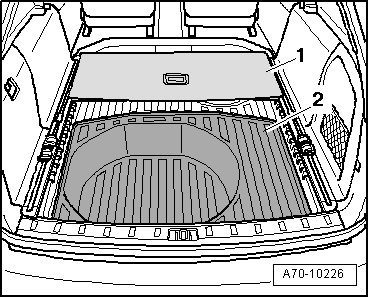
- Remove luggage compartment storage area floor - 1 - and cover for spare wheel - 2 -.
All:
- Release battery strap - 1 - if present.
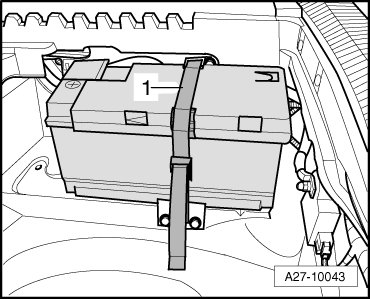
• If the battery strap does not have a quick-release, then remove the screw on the strap.
- Release retaining clips - arrows - using a screwdriver - 2 - and remove ground (GND) terminal cap - 1 -.
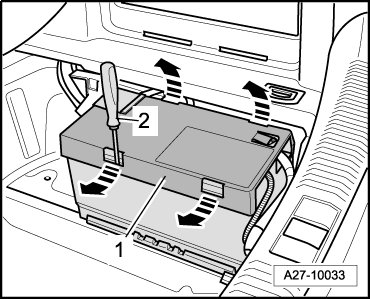
• Illustration shows molded insert removed.
- Connect the battery charger for battery assistance mode. Refer to => [ Battery, Preparing for Support Mode ] Battery, Preparing for Support Mode.
- Remove cover - 4 - above battery positive terminal.
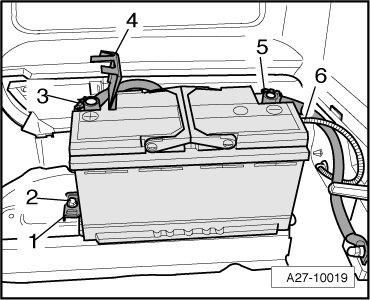
- Disconnect ground cable - 5 - and positive cable - 3 - at battery.
Vehicles with the Fuse Holder on the Positive Cable:
- Loosen the nut - 1 - several turns and remove the positive wire terminal clamp with fuse panel A - 2 - from the battery terminal.
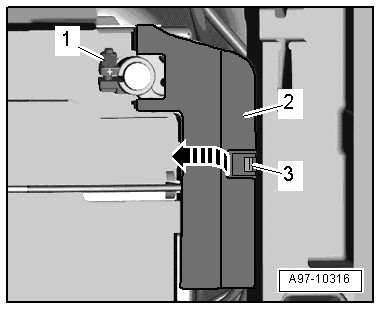
• Ignore - 3 - and the - arrow -.
All Vehicles
- Disconnect central gas venting system tube - 6 -.
- Remove the bolt - 2 - at battery bracket - 1 -.
- Lift battery out of right luggage compartment.
CAUTION!
Pollution risk.
• Battery and sulfuric acid disposal regulations must be followed when disposing of batteries.
Installing
Install in reverse order of removal, observing the following:
• Use the battery specified to ensure optimal performance of the energy management control module (J644).
• Only maintenance-free batteries conforming to standards TL82506 (as of December 1997) and VW75073 (as of August 2001) may be installed.
• If the vehicle was originally equipped with a deep cycle resistant and leak-proof AGM battery, another AGM battery must be installed when replacing.
• Batteries from the Audi parts program have a bottom strip-adapter for adapting to different grip channels. Whether and how bottom strip-adapter is used, refer to operating instructions for battery.
- Insert battery in battery bracket such that lug of battery bracket engages at rear - arrow - in recess in battery base strip - 1 -.
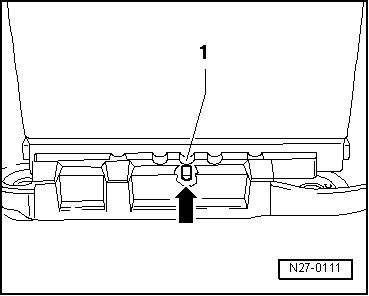
• It should no longer be possible to move the battery.
- Tighten battery retaining bracket - 1 - using bolt - 2 -.
• Lug at battery bracket must engage in recess at battery base strip.
With ignition switched off and electrical consumers switched off, connect battery in the following sequence:
- Connect positive cable terminal clamp - 3 - by hand to battery positive terminal positive and tighten nut.
Vehicles with Battery Monitoring Control Module (J367):
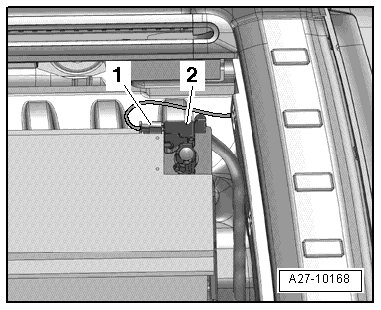
- Disconnect the electrical connector - 1 - on the battery monitoring control module - 1 -.
All Vehicles
- Connect pole shoe - 5 - of ground (GND) cable by hand to battery negative terminal and tighten nut.
Vehicles with Battery Monitoring Control Module (J367):
- Connect the connector - 1 - on the battery monitoring control module - 2 -.
All Vehicles
- Connect central venting system hose - 6 - while observing notes.
- Close cover - 4 - above battery positive terminal.
- Check battery after installation for secure seating.
- Stop battery assistance mode at battery charger.
- After replacing, adapt the battery in the guided fault finding or guided functions mode.
- Select the function or path:

- Follow the instructions on the vehicle diagnosis tester display.
If the battery was not removed and installed in assistance mode, the following steps must be performed after reconnecting the battery:
• Activate the power window regulator one-touch up/down function.
• Synchronize the spare and additional keys to ensure remote control operation. To do so, insert key into ignition lock, switch the ignition on and off again and remove key.
• Check the DTC memories of all the control units and erase under voltage the fault if necessary.
• After connecting the power supply, the ABS warning lamp may only go out after the vehicle has been driven a few yards.
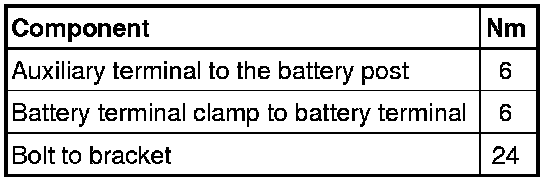
Tightening Specifications