Exhaust System Assembly Overview
Exhaust System Assembly Overview
Front Exhaust System
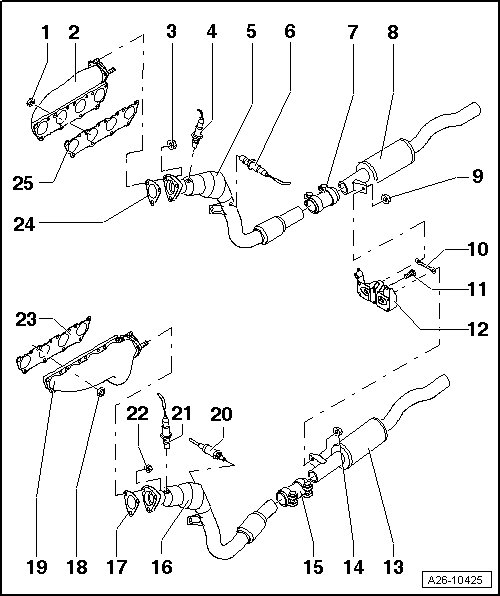
1 Nut, 25 Nm
2 Right Exhaust Manifold
• Removing and installing, refer to => [ Exhaust Manifold ] Right Side Components.
3 Nut, 25 Nm
4 Heated Oxygen Sensor (HO2S) (G39), 50 Nm
• Before the catalytic converter.
• For cylinder bank 1.
• The threads on a new oxygen sensors are coated with assembly paste.
• If reusing the oxygen sensor, coat the threads with hot bolt paste.
• Assembly paste or hot bolt paste must not get into the slots of the oxygen sensor body.
5 Right Catalytic Converter
• With a flex joint.
• Do not bend the flex joint more than 10 degrees or it will get damaged.
• Individual components of the suspended mount, refer to => [ Suspended Mount Components, Right Side ].
• Removing and installing, refer to => [ Catalytic Converter with Front Muffler ] Right Side Components.
6 Oxygen Sensor (O2S) Behind Three Way Catalytic Converter (TWC) (G130), 50 Nm
• For cylinder bank 1.
• The threads on new oxygen sensors are coated with assembly paste.
• If reusing the oxygen sensor, coat the threads with hot bolt paste.
• Assembly paste or hot bolt paste must not get into the slots of the oxygen sensor body.
7 Double Clamp
• Installed position, refer to => [ Front Double Clamp, Installed Position ].
• Before tightening, ensure the exhaust system is tension free. Refer to => [ Exhaust System Installing ] Exhaust System Installing.
• Tighten the bolts evenly.
8 Right Front Muffler
• From the factory, the catalytic converter and front muffler are installed as a single component. For repairs, the front muffler is supplied separately, with a double clamp for the connecting joint.
• Removing and installing, refer to => [ Front Muffler ] Right Side Components.
9 Nut, 25 Nm
10 Tab
11 Bolt, 22 Nm
12 Center Bracket
• Individual components the center bracket, refer to => [ Center Bracket Components ].
13 Left Front Muffler
• From the factory, the catalytic converter and front muffler are installed as a single component. For repairs, the front muffler is supplied separately, with a double clamp for the connecting joint.
• Removing and installing, refer to => [ Front Muffler ] Left Side Components.
14 Nut, 25 Nm
15 Double Clamp
• Installed position, refer to => [ Front Double Clamp, Installed Position ].
• Before tightening, ensure the exhaust system is tension free. Refer to => [ Exhaust System Installing ] Exhaust System Installing.
• Tighten the bolts evenly.
16 Left Catalytic Converter
• With a flex joint.
• Do not bend the flex joint more than 10 degrees or it will get damaged.
• Individual components of the suspended mount, refer to => [ Suspended Mount Components, Left Side ].
• Removing and installing, refer to => [ Catalytic Converter with Front Muffler ] Left Side Components.
17 Gasket
• Always replace.
18 Nut, 25 Nm
19 Left Exhaust Manifold
• Removing and installing, refer to => [ Exhaust Manifold ] Left Side Components.
20 Oxygen Sensor (O2S) 2 Behind Three Way Catalytic Converter (TWC) (G131), 50 Nm
• For cylinder bank 2.
• The threads on new oxygen sensors are coated with assembly paste.
• If reusing the oxygen sensor, coat the threads with hot bolt paste.
• Assembly paste or hot bolt paste must not get into the slots of the oxygen sensor body.
21 Heated Oxygen Sensor (HO2S) 2 (G108), 50 Nm
• In front of the catalytic converter.
• For cylinder bank 2.
• The threads on new oxygen sensors are coated with assembly paste.
• If reusing the oxygen sensor, coat the threads with hot bolt paste.
• Assembly paste or hot bolt paste must not get into the slots of the oxygen sensor body.
22 Nut, 25 Nm
23 Gasket
• Always replace.
24 Gasket
• Always replace.
25 Gasket
• Always replace.
Rear Exhaust System
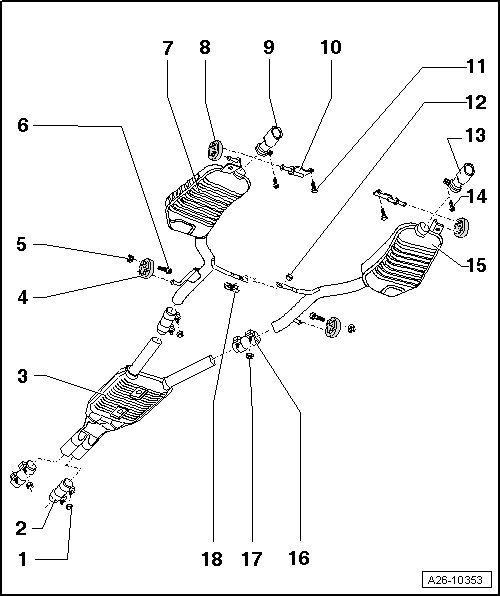
1 Nut, 25 Nm
2 Double Clamp
• Installed position, refer to => [ Front Double Clamp, Installed Position ].
• Before tightening, ensure the exhaust system is tension free. Refer to => [ Exhaust System Installing ] Exhaust System Installing.
• Tighten the bolts evenly.
3 Center Muffler
• From the factory, the center and rear mufflers are installed as a single component. In cases of repair, the center and rear muffler are supplied individually and with a double clamp for the connecting joint.
• Cutting through at separating point, refer to => [ A separating point has been provided in the connecting pipe for individual replacement of the center or rear muffler ].
4 Suspended Mount
5 Nut, 25 Nm
6 Bolt
7 Left Rear Muffler
• From the factory, the center and rear mufflers are installed as a single component. In cases of repair, the center and rear muffler are supplied individually and with a double clamp for the connecting joint.
• Cutting through at separating point, refer to => [ A separating point has been provided in the connecting pipe for individual replacement of the center or rear muffler ].
• Replacing the tailpipe, refer to => [ Tailpipe, Removing and Installing ].
8 Suspended Mount
9 Tailpipe
• Replacing, refer to => [ Tailpipe, Removing and Installing ].
10 Suspended Mount Bracket
• To the body.
11 Bolt, 22 Nm
12 Nut, 23 Nm
13 Tailpipe
• Replacing, refer to => [ Tailpipe, Removing and Installing ].
14 Nut, 23 Nm
15 Right Rear Muffler
• From the factory, the center and rear mufflers are installed as a single component. In cases of repair, the center and rear muffler are supplied individually and with a double clamp for the connecting joint.
• Cutting through at separating point, refer to => [ A separating point has been provided in the connecting pipe for individual replacement of the center or rear muffler ].
• Replacing the tailpipe, refer to => [ Tailpipe, Removing and Installing ].
16 Double Clamp
• For individual replacement of the center and rear mufflers.
• Installed position, refer to => [ Rear Double Clamp, Installed Position ].
• Before tightening, ensure the exhaust system is tension free. Refer to => [ Exhaust System Installing ] Exhaust System Installing.
• Tighten the bolts evenly.
17 Nut, 25 Nm
18 Clamping Piece
Suspended Mount Components, Left Side
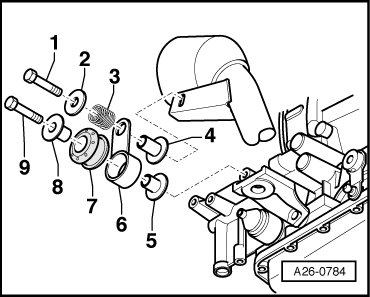
1. Bolt - 25 Nm
2. Washer
3. Pressure spring
4. Spacer sleeve
5. Spacer sleeve
6. Plate
7. Rubber bushing
8. Spacer sleeve
9. Bolt - 25 Nm
Suspended Mount Components, Right Side
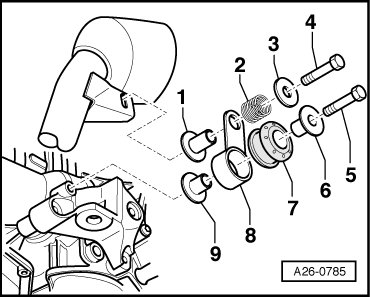
1. Spacer sleeve
2. Pressure spring
3. Washer
4. Bolt - 25 Nm
5. Bolt - 25 Nm
6. Spacer sleeve
7. Rubber bushing
8. Plate
9. Spacer sleeve
Center Bracket Components
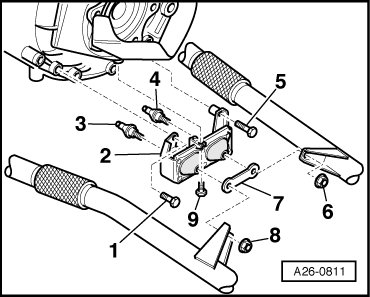
1. Bolt - 22 Nm
2. Bracket
3. Threaded stud
4. Threaded stud
5. Bolt - 22 Nm
6. Nut, self-locking - 18 Nm
7. Tab
8. Nut, self-locking - 18 Nm
9. Bolt - 22 Nm
Front Double Clamp, Installed Position
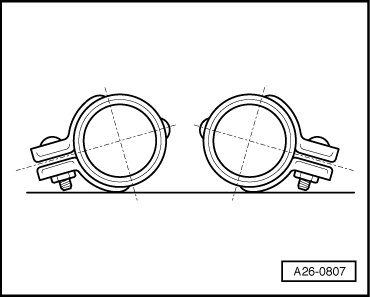
- When installing the double clamp, ensure that bolt ends do not project over the lower edge of the double clamp.
• Threaded connections point outward.
Rear Double Clamp, Installed Position
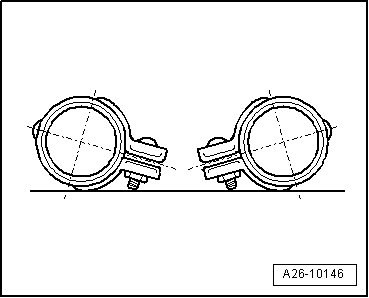
- When installing the double clamp, ensure that the bolt ends do not project over the lower edge of the double clamp.
• Threaded connections face each other.
Tailpipe, Removing and Installing
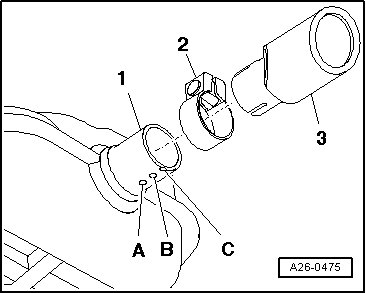
- Separate the tailpipe - 1 - at point - C - using the (VAS 6254).
- Install the tailpipe - 3 - up to the mark - A - so that the slot on the tailpipe lines up with the mark - B -.
- Tighten the bolts for the double clamp - 2 -.
A separating point has been provided in the connecting pipe for individual replacement of the center or rear muffler
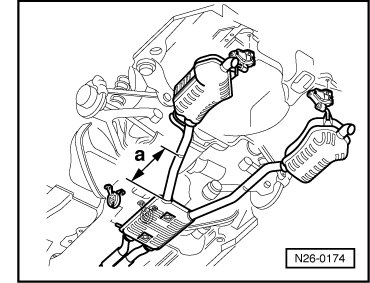
• The separating point is marked by depressions around the circumference of the exhaust pipe.
- Separate the exhaust pipe at the separating point using the (VAS 6254).
Dimension - a - approximately 244 mm.