Procedures
Selector Lever Cable, Checking and Adjusting
Special tools, testers and auxiliary items required
• Pry Lever - RMV Outside Mirror (80 - 200)
Checking:
- Move the selector lever into P.
- Lift the vehicle.
- Remove shield from lever/selector shaft.
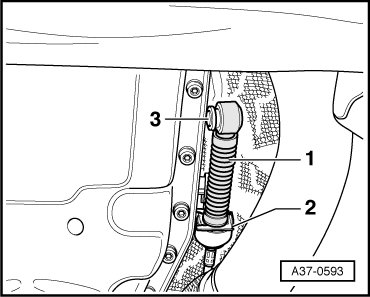
- Remove the selector lever cable ball socket - 1 - from the selector shaft lever - 3 - using the (80 - 200)
• Do not bend the selector lever cable.
- Move the selector lever from P to S.
- Check the front protective boot on the selector lever cable for damage; replace the cable if necessary.
• Selector mechanism and selector lever cable must move freely. If necessary, replace selector lever cable (=> [ Selector Lever Cable ] Selector Lever Cable) or service selector mechanism.
- Remove the handle on the selector lever. Refer to => [ Selector Lever Handle ] Selector Lever Handle.
- Move the selector lever into N.
- Remove front ashtray.
- Remove center console cover panel.
- Disconnect the connector - 1 - from the protective cover - 2 -.
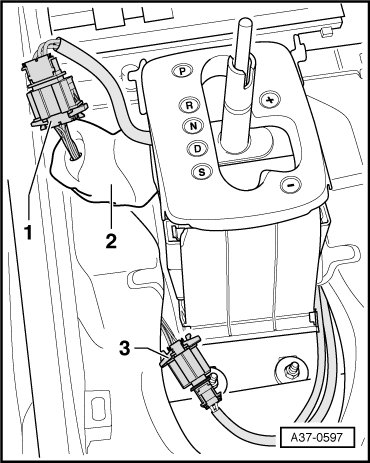
- Disconnect the electrical connector - 1 - from the circuit board.
- Disconnect the electrical connector - 3 - for the shift lock solenoid (N110).
• The electrical connector - 3 - also has a protective cover.
- To disconnect cover from selector mechanism function unit, carefully release retaining tabs - arrows - one after another.
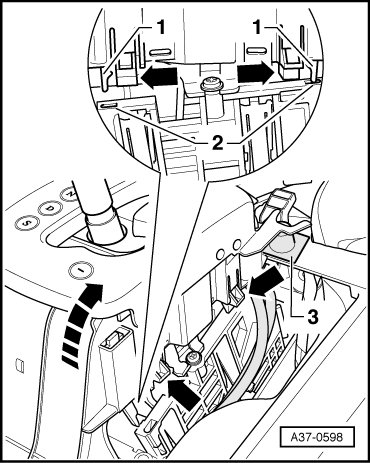
- Pull cover slightly upward until cover guides - 1 - are outside of openings - 2 -.
- Then swivel the rear of the cover towards the top, in the direction of the - arrow -, while simultaneously pulling it over the cross brace of the center console - 3 -.
- Move the selector lever into P.
- Place shift selector shaft lever on transmission in P position. The detent lever must latch into the parking lock gear; both front wheels are blocked (do not turn them).
• To be sure to place the lever/shift selector shaft in position P, shift the lever/shift selector shaft on the transmission all the way forward to P. Then move it again three shift positions to the back (opposite to the driving direction).
• Selector lever cable must be pressed onto the selector shaft lever.
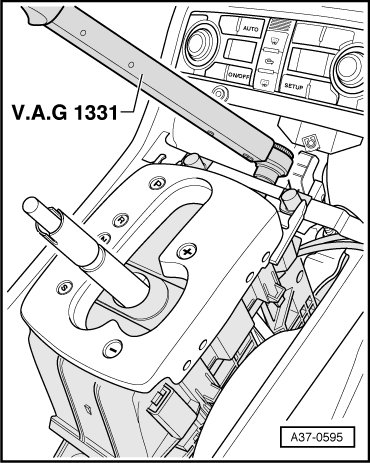
- If necessary, loosen selector lever cable locking screw with Torx(R) 25 socket, press on selector lever cable and re-tighten locking screw.
Adjusting
- Move the selector lever into D.
- Loosen selector lever cable locking screw with Torx(R) 25 socket.
• Loosen locking screw approximately 1 turn - do not remove completely
• With clamp screw loosened, shift mechanism selector lever must remain in position P, otherwise adjustment will be incorrect.
- Carefully move the selector lever forwards and backwards slightly without shifting to a different selector lever position.
- Tighten selector lever cable locking screw with Torx(R) 25 socket (13 Nm).
• Do not pull selector lever back or forward while installing, otherwise adjustment will be incorrect.
- Guide the cover over the shift selector - 4 - and simultaneously to the front area under the cross brace for the center console - 3 -.
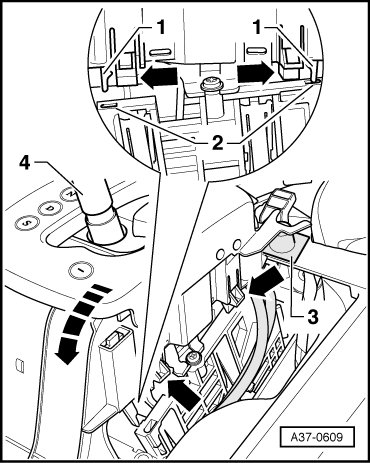
- Then swivel the cover downward and to the rear - arrow direction -.
- Insert cover guides - 1 - into openings - 2 -.
- Then press the cover until the retaining tabs - arrow - clip in.
- Disconnect the electrical connector - 3 - for the shift lock solenoid (N110).
- Slide the electrical connector - 3 - into the protective cover (not shown here).
- Connect the electrical connector - 1 - to the circuit board.
- Slide the electrical connector - 1 - into the protective cover - 2 -.
- Install ashtray and center console cover panel.
- Install the handle on the selector lever. Refer to => [ Selector Lever Handle ] Selector Lever Handle.
- Selector mechanism, checking, refer to => [ Selector Mechanism, Checking ] Procedures.