Windshield, Preparing For Installation
Preparing Used Undamaged Window
- When reusing an undamaged windshield, cut back remaining adhesive bead on windshield and flange so that it is even using VAG1561 electric cutter and VAG1561/10 scraper, but do not remove adhesive completely.
- Leftover adhesive material is required as a base for better adhesion of the new adhesive bonding/sealing material.
CAUTION!
- Keep bonding surface free of dirt and grease.
- Do not cut back bonding surface until shortly before installation.
- Do not prime bonding surface and do not treat with cleaning solution.
Installing New Window
NOTE: Any stickers to be placed on the window (e.g. airbag) must be placed at same position on new window.
- Clean adhesion area around edge of window using glass cleaner D 009 401 04.
- Prime surface using D 009 200 02 as described later.
CAUTION!
The ceramic application on the windshield is not primed! It is essential that you prime the surface before applying the adhesive material.
Fig. 1 Applying Primer
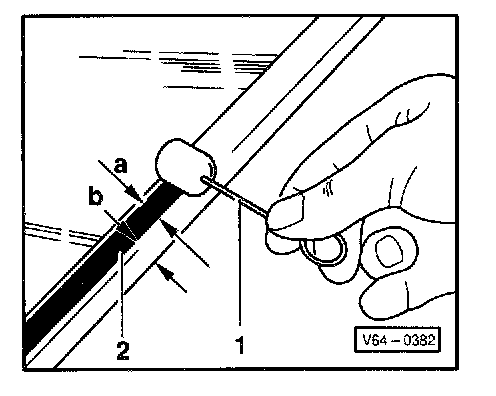
- Apply primer -2- evenly in one motion using applicator -1-.
Initially apply using felt ball saturated with primer.
- Allow primer to air dry for approx. 10 minutes.
Width of primer coat -a- = approx. 20 mm (3/4 in.).
- Apply primer in center of adhesive bead.
Fig. 2 Dimensions For Application Of Adhesive
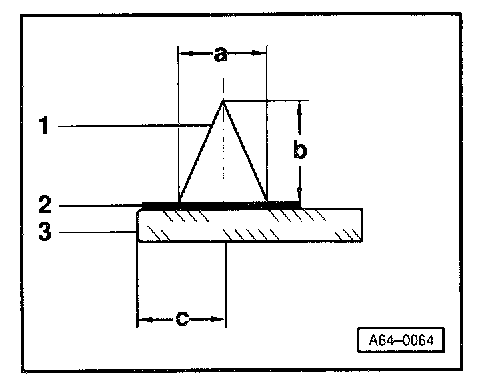
1 - Adhesive bead
2 - Primer
3 - Windshield
Dimension -a- = 8 mm
Dimension -b- = 12 mm
Dimension -c- = 8 mm to edge of window (all around)
Reworking Windshield Flange
- If windshield flange has been repaired or replaced paint structure should be restored according to the following specifications:
- Reworked area must be cleaned using D 009 401 04, then primed using D 009 200 02.